Maps of Gallipoli
Sir George Grey Special Collections hold a number of First World War maps of Gallipoli and surrounding regions. Seven of these maps have been digitised and are accessible via the Heritage Images database.
In April 1915, New Zealand soldiers, alongside those from Australia, Britain and France, invaded the Gallipoli Peninsula. This was to ensure an Allied naval force could break through the Dardanelles Strait and seize or threaten the Ottoman capital of Constantinople, and hopefully the Ottoman Empire might be forced out of the war.
The map above is of the Dardanelles and Bosporus around the time of the Gallipoli landings. The mountainous terrain is highlighted by the pictorial style of the map. There are inset maps of Constantinople, The Narrows, the Balkan states and Gallipoli.
The map on the left is a hand-drawn plan, showing defences at the Apex, compiled from surveys made by Privates Walton and Elmes. The Apex was a knoll at the furthest point into the range the ANZACs were able to dig -- about 460 metres from the high point at Chunuk Bair. At the beginning of August 1915, the Wellington Battalion managed to take Chunuk Bair and hold it with desperate fighting until they were relieved by two British battalions. However, these were soon overrun by overwhelming Ottoman forces and the troops fell back to positions at the Apex.
The Gallipoli campaign would progress no further into the peninsula. The plan shows tunnels and trenches leading up to the front line at the Apex, including one called Cuba Street.
The original proposed landing place for the ANZAC troops
had been on relatively flat ground sloping up to the heights at Mal Tepe. ANZAC
cove, however, was on one of the spurs of the Sari Bair Range that jutted down
to the sea, and the troops were immediately confronted with steep hills cut by
deep ravines. Most of this ground was
overlooked from the hills and exposed to enemy fire.
The topographical map above is the first sheet of three showing the New Zealand positions at Gallipoli. This map shows the Apex, just below Chunuk Bair.
The map above is of the Gallipoli peninsula and shows areas where ANZAC troops were entrenched. The key at the top of the map indicates the term: 'indifferent roads' and the map also includes a glossary of Turkish terms and topographical elements.
Author: Zoë Colling, Sir George Grey Special Collections. With information from the 'It'll be over by Christmas: World War 1914 -1918' exhibition labels by Ian Snowdon.
In April 1915, New Zealand soldiers, alongside those from Australia, Britain and France, invaded the Gallipoli Peninsula. This was to ensure an Allied naval force could break through the Dardanelles Strait and seize or threaten the Ottoman capital of Constantinople, and hopefully the Ottoman Empire might be forced out of the war.
The British landed at Cape Helles on the southern tip of
the peninsula, while the Australian and New Zealand Army Corps (ANZACs) landed
half way up the peninsula, in order to cut off the Ottomans’ supply route to
the south.
Neither force managed to achieve their primary objectives
and the conflict soon turned into a stalemate of trench warfare.
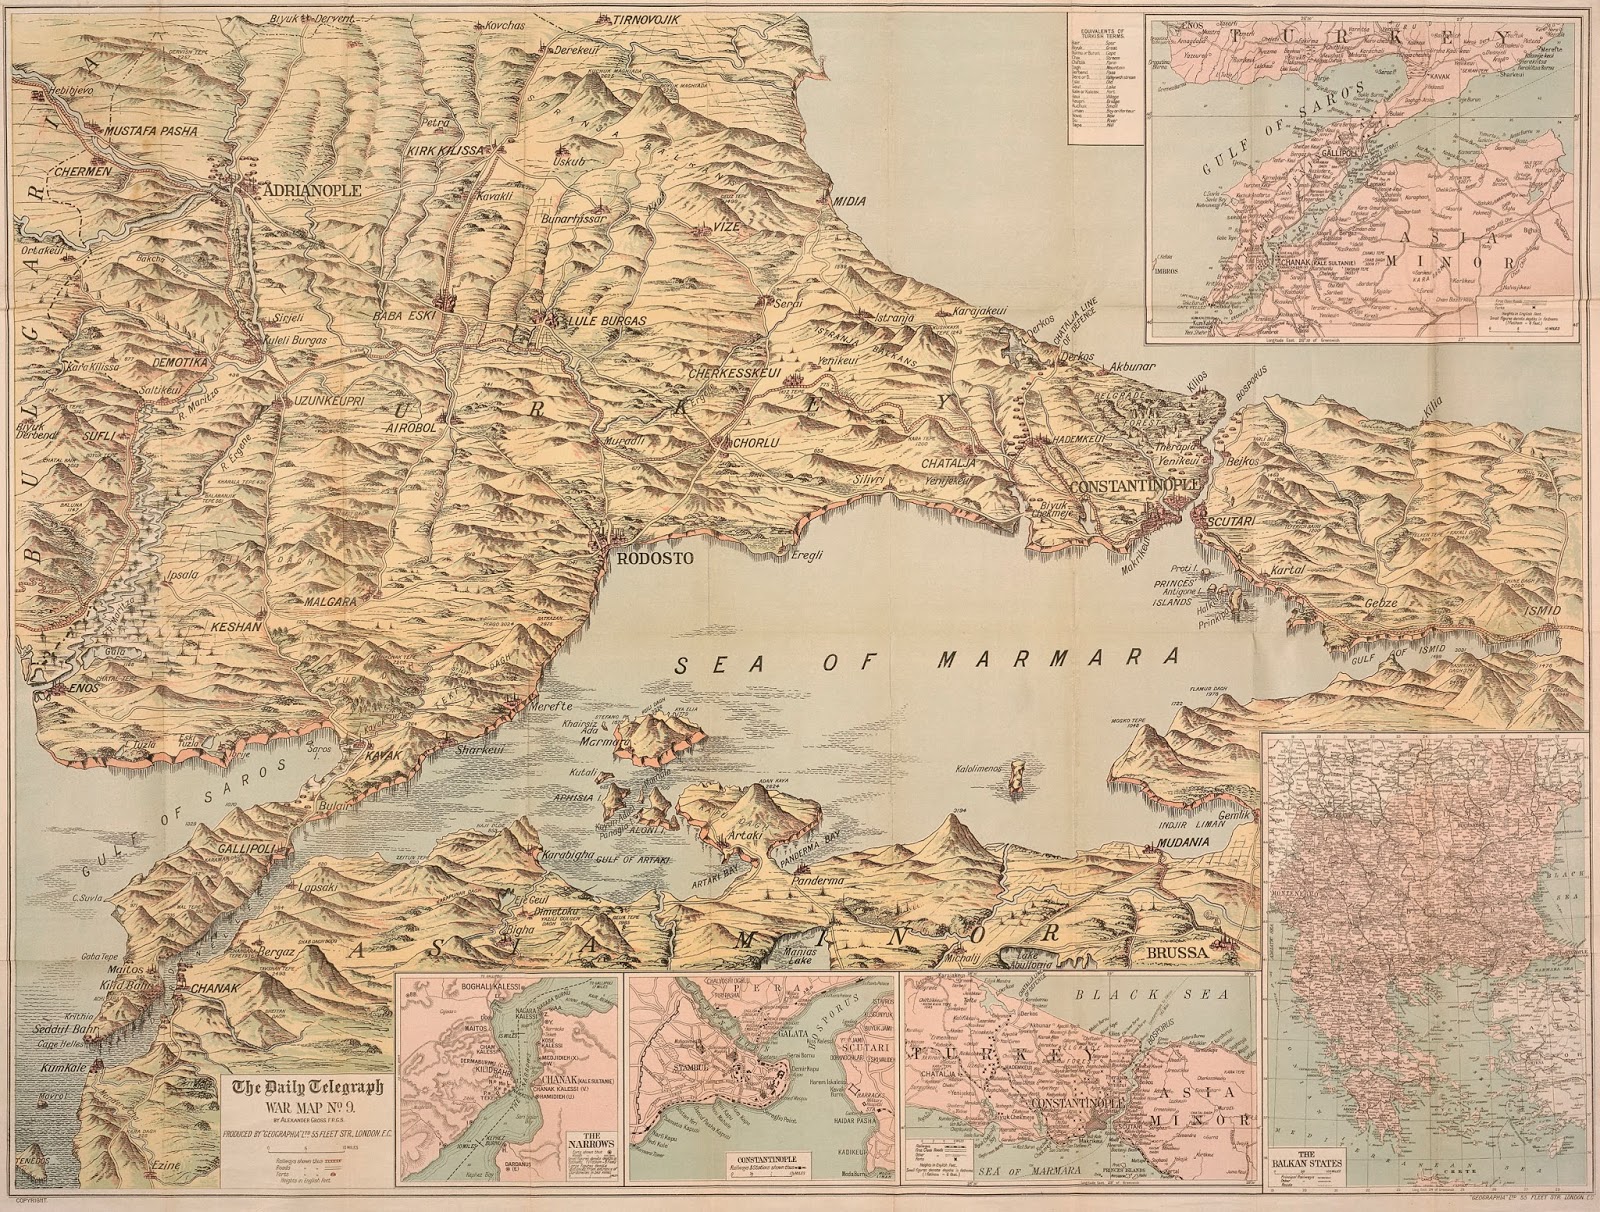 |
| Ref: The Daily Telegraph picture map of the Dardanelles... , 1915, Sir George Grey Special Collections, Auckland Libraries, NZ Map 4866. |
 |
| Ref: Plan shewing defences at Apex... 1915, Sir George Grey Special Collections, Auckland Libraries, NZ Map 1277. |
The map on the left is a hand-drawn plan, showing defences at the Apex, compiled from surveys made by Privates Walton and Elmes. The Apex was a knoll at the furthest point into the range the ANZACs were able to dig -- about 460 metres from the high point at Chunuk Bair. At the beginning of August 1915, the Wellington Battalion managed to take Chunuk Bair and hold it with desperate fighting until they were relieved by two British battalions. However, these were soon overrun by overwhelming Ottoman forces and the troops fell back to positions at the Apex.
The Gallipoli campaign would progress no further into the peninsula. The plan shows tunnels and trenches leading up to the front line at the Apex, including one called Cuba Street.
 |
| Ref: ANZAC New Zealand Division trench plan: the Apex, 1915, Sir George Grey Special Collections, Auckland Libraries, NZ Map 5426. |
The topographical map above is the first sheet of three showing the New Zealand positions at Gallipoli. This map shows the Apex, just below Chunuk Bair.
 |
| Ref: The Daily Telegraph war map of the Gallipoli Peninsula, Sir George Grey Special Collections, Auckland Libraries, NZ Map 3037. |
Author: Zoë Colling, Sir George Grey Special Collections. With information from the 'It'll be over by Christmas: World War 1914 -1918' exhibition labels by Ian Snowdon.
Comments
Post a Comment
Kia ora! Please leave your comment below.